Saturday 24 November 2018

ERROR: Signature extraction failed: Traceback (most recent call last)

I was trying to download youtube playlist in mp3 format. When I tried below command, I was getting "ERROR: Signature extraction failed: Traceback (most recent call last)"

$youtube-dl -cit --extract-audio --audio-format mp3 https://www.youtube.com/playlist?list=PL4uUU2x5ZgR1JOlcY9SZB94MW6fBE8ovU

Solution:

Pulled latest version and it is worked:

sudo wget https://yt-dl.org/latest/youtube-dl -O /usr/local/bin/youtube-dl
sudo chmod a+x /usr/local/bin/youtube-dl
hash -r


Sunday 10 June 2018

ERROR ReferenceError: is not defined in angular 4

ERROR ReferenceError:  is not defined

Hi, I was adding click event function in angular 4 components html. below is the code for the same.

<span (click)="removeCity(idx)" >remove</span>

and in component ts file, function written as,

 removeCity = function(index) {

        this.cityList.splice(index, 1);

    }

Where cityList is a array of cities defined in ts file.

But, when I was runing the code, I was getting "ERROR ReferenceError:   is not defined in" Then, did followed below steps from terminal to import jquery in app.module.ts

$ npm i jquery --save
$ npm i @types/jquery -D

and imported 'import * as $ from 'jquery';' in app.module.ts

Now, error is vanished.

Saturday 9 June 2018

Angular4 - node install and upgrade

Angular4 - node install and upgrade

I had installed old version of node js in my laptop ubuntu OS. to start with angular 4 and CLI, we need version more than "node":">= 8.9.0","npm":">= 5.5.1" but my current version is "node":"4.7.2","npm":"3.5.2".

Below are the steps I followed to upgrade and install node with latest version.

First uninstall existing node version.

sachin@sachin-E470:~$ sudo apt-get install --reinstall nodejs-legacy
[sudo] password for sachin:
Reading package lists... Done
Building dependency tree       
Reading state information... Done
0 upgraded, 0 newly installed, 1 reinstalled, 0 to remove and 176 not upgraded.
Need to get 30.9 kB of archives.
After this operation, 0 B of additional disk space will be used.
Get:1 http://old-releases.ubuntu.com/ubuntu zesty/universe amd64 nodejs-legacy all 4.7.2~dfsg-1ubuntu3 [30.9 kB]
Fetched 30.9 kB in 20s (1,495 B/s)        
(Reading database ... 275944 files and directories currently installed.)
Preparing to unpack .../nodejs-legacy_4.7.2~dfsg-1ubuntu3_all.deb ...
Unpacking nodejs-legacy (4.7.2~dfsg-1ubuntu3) over (4.7.2~dfsg-1ubuntu3) ...
Setting up nodejs-legacy (4.7.2~dfsg-1ubuntu3) ...
Processing triggers for man-db (2.7.6.1-2) ...
sachin@sachin-E470:~$ sudo n rm 4.7.2
sachin@sachin-E470:~$ sudo npm uninstall -g n
removed 1 package in 0.053s

Install Latest Version:


sachin@sachin-E470:~$ sudo npm cache clean -f
npm WARN using --force I sure hope you know what you are doing.
sachin@sachin-E470:~$ sudo npm install -g n
/usr/local/bin/n -> /usr/local/lib/node_modules/n/bin/n
/usr/local/lib
`-- n@2.1.11

sachin@sachin-E470:~$ sudo n stable

    install : node-v10.4.0
      mkdir : /usr/local/n/versions/node/10.4.0
      fetch : https://nodejs.org/dist/v10.4.0/node-v10.4.0-linux-x64.tar.gz
######################################################################## 100.0%
  installed : v10.4.0


Now, we can check the node version installed as shown below:

sachin@sachin-E470:~$ node -v
v10.4.0


Check node and npm versions:

sachin@sachin-E470:~$ node -v
v10.4.0
sachin@sachin-E470:~$ npm -v
6.1.0

To install CLI:

sachin@sachin-E470:~$ npm install -g @angular/cli

Here -g means it is installed globally and not for specific project.

To check angular CLI installed or not:

sachin@sachin-E470:~$ ng -v

    _                  _ ____ _     ___
   / \  _ __ __ _ _   _| | __ _ _ __   / ___| | |_ _|
  / △ \ | '_ \ / _` | | | | |/ _` | '__|   | | | | | |
 / ___ \| | | | (_| | |_| | | (_| | |      | |___| |___ | |
/_/   \_\_| |_|\__, |\__,_|_|\__,_|_|       \____|_____|___|
               |___/
   

Angular CLI: 6.0.8
Node: 10.4.0
OS: linux x64
Angular:
...

Package                      Version
------------------------------------------------------
@angular-devkit/architect    0.6.8
@angular-devkit/core         0.6.8
@angular-devkit/schematics   0.6.8
@schematics/angular          0.6.8
@schematics/update           0.6.8
rxjs                         6.2.0
typescript                   2.7.2


Next - We will see demo for sample project in angular.

Its done!!!!


Wednesday 21 March 2018

Install Oracle Weblogic Server 12c in Ubuntu/Unix

Install Oracle Weblogic Server 12c in Ubuntu/Unix


  1. Install JDK 1.8 (we will need Oracle JDK. OpenJDK will not be supported.)
  2. Downlolad weblogic from below URL:


3. Keep this  fmw_12.2.1.3.0_wls_Disk1_1of1.zip downloaded file under ‘/home/sachin/weblogic’ folder and extract it.


$cd /home/sachin/weblogic


$unzip  fmw_12.2.1.3.0_wls_Disk1_1of1.zip (To extract zip file)
4. Run this extracted jar from zip file file

5. Click on next button, you will see below screen.


6. We can update the weblogic while installing. As of now, we will skip updates and click on next button.


7. Set ORACLE_HOME and click on next button.


8. Select installation type as ‘Weblogic Server’ and click on next button.


9. Click on next button


10. We will see installation summary as shown below . Then click on Install button.


11. Setup will show progress


12. Once setup finishes all steps, click on next button. We will see Installation complete wizard. Click on Finish button.


13. It will ask create new domain or use existing domain. Here we will create new domain and click on next button.


14. Select Product templates and click on next button.


15. Set username(weblogic) and password(weblogic@1) for weblogic server


16. Set development mode and click on nect button

17. If needed, do some Advanced configuration (Here we are not doing  any)and click on next button.


18. Check configuration summary and click on Create  button.


19. We will see progress of all the steps and then click on Next button


20. We will see domain location and Admin Server url. This is end of installation of weblogic server.


21. Start weblogic server
Go to domain location: /home/sachin/Oracle/Middleware/Oracle_Home/user_projects/domains/base_domain
And run $ sh startWebLogic.sh


22. We will see weblogic start up as shown below:


Enter username and password and click on Login button.


24. Congratullation!!!, you are able to access WebLogic ServerAdministration Console 12c

Happy Learning!!!

Wednesday 14 March 2018

git: cannot open git-receive-pack

I was trying to import git repo in eclipse. it was imported successfully but when I tried to push changes to upstream, I found 'git: cannot open git-receive-pack' in eclipse. Then I realized, before few days, I had configured SSL cert private key in my eclipse, So to get rid off from this error, below steps I have followed.

If your git configured with SSL cert or it is outdated, We are getting such an error.
Solution:
Solution1 - From terminal - > git config http.sslVerify false
Solution2 - If you are using eclipse, then
  1. open preferences via application menu Window => Preferences (or on OSX Eclipse => Settings).
  2. Navigate to Team => Git => Configuration
  3. click Add entry..., then put http.sslVerify in the key box and false in the value box.


Its done!!!


Thursday 15 February 2018

find and calculate address in an array for given index

I Was confused for how we get the address and address calculation done in an array when we get element from array for passing an index.

So, any data structure used to achieve this mechanism? is there any mapping in memory or hashing or indexing like used in DB? 

It is simple, just like mathematical formula.

Consider one dim array ARR of N integer(2 byte memory for each element) stored in memory.

Now, to find address of ARR[i]:

Adddress(ARR[i]) = Base Address + No. Of bytes for each element * (Find index - Lower bound of ARR)

Here, 

Base Address = starting address of an array in memory
No. Of bytes for each element  = for integer, it is 2 bytes
Find index = which element you are searching in an array
Lower bound of ARR = lower bound  index of array

For Ex. consider integer array int[] ARR = new int[4];


Address Value Element
100 11 1st
102 12 2nd
104 13 3rd
106 14 4th


As per above table, 

Addresss(ARR[2]) = 100 + 2* (2-0) = 100+4=104

Happy Learning!!!

Sunday 11 February 2018

4 things for to get max output from programming


4 things for to get max output from programming

1. Study and try to predict the behavior of the program
2. try to implement the behavior 
3. fix it if assuming it is broken
4. then and then look for expert solution


Saturday 3 February 2018

HashMap with Null Key and Null Value

HashMap does not call hashcode when null is passed as key and null Key is handled as special case.

Put Method

HashMap puts null key in bucket 0 and maps null as key to passed value. it does it by linked list data structure it uses internally.
Linked list data structure used by HashMap (a static class in HashMap.java)
static class Entry<K,V> implements Map.Entry<K,V> {
        final K key;
        V value;
        Entry<K,V> next;
        final int hash;
}
In Entry class the K is set to null and value mapped to value passed in put method.

Get Method

While in Hashmap get method the checks if key is passed as null. Search Value for null key in bucket 0.
Hence there can only be one null key in one hashmap object.


When you put NULL to HashMap there is special check if you are trying to put NULL as key (called putForNullKey()). It is special case and works not like you are trying to put some object which is not null, and as you may see it even doesn't go to hash calculation.


public V put(K key, V value) {
    if (table == EMPTY_TABLE) {
        inflateTable(threshold);
    }
    if (key == null)
        return putForNullKey(value);
    int hash = hash(key);
    int i = indexFor(hash, table.length);
    for (Entry<K,V> e = table[i]; e != null; e = e.next) {
        Object k;
        if (e.hash == hash && ((k = e.key) == key || key.equals(k))) {
            V oldValue = e.value;
            e.value = value;
            e.recordAccess(this);
            return oldValue;
        }
    }

    modCount++;
    addEntry(hash, key, value, i);
    return null;
}

private V putForNullKey(V value) {
    for (Entry<K,V> e = table[0]; e != null; e = e.next) {
        if (e.key == null) {
            V oldValue = e.value;
            e.value = value;
            e.recordAccess(this);
            return oldValue;
        }
    }
    modCount++;
    addEntry(0, null, value, 0);
    return null;
}

Wednesday 31 January 2018

Docker Install error: Err:1 http://in.archive.ubuntu.com/ubuntu zesty/universe amd64 cgroupfs-mount all 1.3

I am using Ubuntu. while installing docker, I was getting below error, then I followed below steps to overcome the same.

 Err:1 http://in.archive.ubuntu.com/ubuntu zesty/universe amd64 cgroupfs-mount all 1.3


Open Terminal & run:

sudo gedit /etc/apt/sources.list
Replace url in.archive.ubuntu.com and security.ubuntu.com with old-releases.ubuntu.com

save and close it.

Now run sudo apt-get update and after then install any packages you want to install.

Then, I ran Docker install command,
sachin@sachin-E470:~$ sudo apt-get install docker-ce

sachin@sachin-E470:~$ docker --version

Docker version 17.12.0-ce, build c97c6d6

and its worked!!

Thursday 4 January 2018

SpringBoot RabbitMQ Integration

SpringBoot RabbitMQ Integration


Spring Integration enables lightweight messaging within Spring-based applications and supports integration with
external systems via declarative adapters. Those adapters provide a higher-level of abstraction over Spring's support
for remoting, messaging, and scheduling. Spring Integration's primary goal is to provide a simple model for building
enterprise integration solutions while maintaining the separation of concerns that is essential for producing
maintainable, testable code.

Video:


Why RabbitMQ:

  • Decouple message publisher and consumer
  • Store the messages
  • Routing of messages
  • Monitoring and management of messages

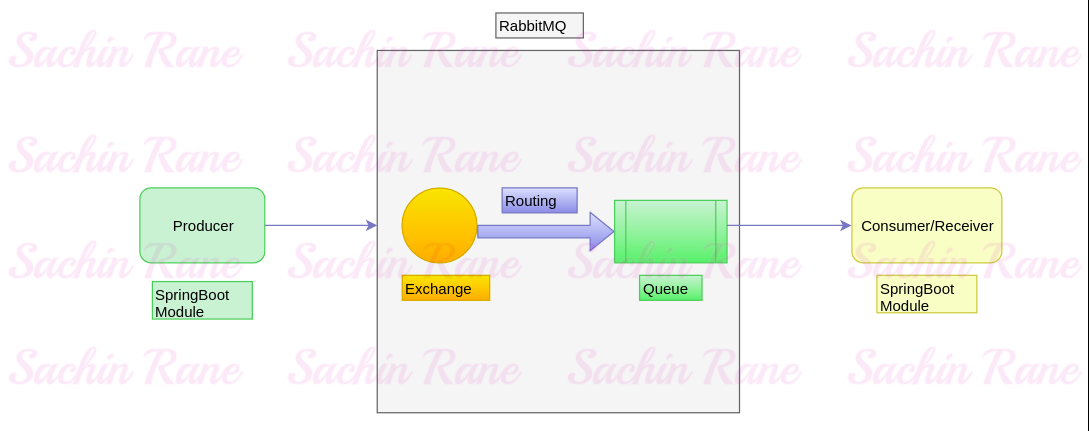
SpringBoot RabbitMQ Diagram


Producer:


In this spring boot module, We will config rabbitMQ details including exchange, queue and we will send message to queue.


Exchange:

We will create one exchange and send message to this exchange.


Routing :

We will create routing key and bind exchange with specific queue with routing key.


Queue:


Here, our message will be stored. Once consumed by consumers, message will be removed from queue.

RabbitMQ Configuration in spring boot:


application.properties


server.port=8001


#Rabbitmq configuration
spring.rabbitmq.host = 127.0.0.1
spring.rabbitmq.port = 5672
spring.rabbitmq.username = guest
spring.rabbitmq.password = guest


RobbitMqConfig.java
package com.sachin4java.rabbitmqproducer.config;


import org.springframework.amqp.core.Binding;
import org.springframework.amqp.core.BindingBuilder;
import org.springframework.amqp.core.Queue;
import org.springframework.amqp.core.TopicExchange;
import org.springframework.amqp.rabbit.connection.ConnectionFactory;
import org.springframework.amqp.rabbit.listener.SimpleMessageListenerContainer;
import org.springframework.amqp.rabbit.listener.adapter.MessageListenerAdapter;
import org.springframework.context.annotation.Bean;
import org.springframework.context.annotation.Configuration;


import com.sachin4java.rabbitmqproducer.listener.MessageListener;

@Configuration
public class RobbitMqConfig {
public static final String ROUTING_KEY = "my.queue.key";
@Bean
Queue queue() {
return new Queue(ROUTING_KEY, true);
}


@Bean
TopicExchange exchange() {
return new TopicExchange("my_queue_exchange");
}


@Bean
Binding binding(Queue queue, TopicExchange exchange) {
return BindingBuilder.bind(queue).to(exchange).with(ROUTING_KEY);
}
//Below highlighted for RabbitMQ listener


@Bean
SimpleMessageListenerContainer container(ConnectionFactory connectionFactory,
MessageListenerAdapter listenerAdapter) {
SimpleMessageListenerContainer container = new SimpleMessageListenerContainer();
container.setConnectionFactory(connectionFactory);
container.setQueueNames(ROUTING_KEY);
container.setMessageListener(listenerAdapter);
return container;
}


@Bean
MessageListenerAdapter myQueueListener(MessageListener listener) {
return new MessageListenerAdapter(listener, "onMessage");
}
}


Module name
Port
Type
Dependencies
rabbitmq-producer
8001
Sender
Web, AMQP
rabbitmq-consumer
8002
Receiver
Web, AMQP


Rabbitmq-producer module:


ProducerController.java


package com.sachin4java.rabbitmqproducer.controller;


import org.springframework.beans.factory.annotation.Autowired;
import org.springframework.web.bind.annotation.GetMapping;
import org.springframework.web.bind.annotation.RequestMapping;
import org.springframework.web.bind.annotation.RequestParam;
import org.springframework.web.bind.annotation.RestController;


import com.sachin4java.rabbitmqproducer.producer.MessageProducer;


@RestController
@RequestMapping("/producer")
public class ProducerController {
@Autowired
   private MessageProducer messageProducer;
   
@GetMapping
public void produce(@RequestParam String message) {
messageProducer.sendMessage(message);
   
}


}


MessageProducer.java


package com.sachin4java.rabbitmqproducer.producer;


import java.util.Date;


import org.springframework.amqp.rabbit.core.RabbitTemplate;
import org.springframework.beans.factory.annotation.Autowired;
import org.springframework.stereotype.Component;


import com.sachin4java.rabbitmqproducer.config.RobbitMqConfig;


@Component
public class MessageProducer {
@Autowired
   private RabbitTemplate rabbitTemplate;
public void sendMessage(String message) {


System.out.println(new Date());
rabbitTemplate.convertAndSend(RobbitMqConfig.ROUTING_KEY, message);
   System.out.println("Is listener returned ::: "+rabbitTemplate.isReturnListener());
   System.out.println(new Date());
}
}
RobbitMqConfig.java


package com.sachin4java.rabbitmqproducer.config;

import org.springframework.amqp.core.Binding;
import org.springframework.amqp.core.BindingBuilder;
import org.springframework.amqp.core.Queue;
import org.springframework.amqp.core.TopicExchange;
import org.springframework.amqp.rabbit.connection.ConnectionFactory;
import org.springframework.amqp.rabbit.listener.SimpleMessageListenerContainer;
import org.springframework.amqp.rabbit.listener.adapter.MessageListenerAdapter;
import org.springframework.context.annotation.Bean;
import org.springframework.context.annotation.Configuration;


import com.sachin4java.rabbitmqproducer.listener.MessageListener;

@Configuration
public class RobbitMqConfig {
public static final String ROUTING_KEY = "my.queue.key";
@Bean
Queue queue() {
return new Queue(ROUTING_KEY, true);
}


@Bean
TopicExchange exchange() {
return new TopicExchange("my_queue_exchange");
}


@Bean
Binding binding(Queue queue, TopicExchange exchange) {
return BindingBuilder.bind(queue).to(exchange).with(ROUTING_KEY);
}


/*@Bean
SimpleMessageListenerContainer container(ConnectionFactory connectionFactory,
MessageListenerAdapter listenerAdapter) {
SimpleMessageListenerContainer container = new SimpleMessageListenerContainer();
container.setConnectionFactory(connectionFactory);
container.setQueueNames(ROUTING_KEY);
container.setMessageListener(listenerAdapter);
return container;
}


@Bean
MessageListenerAdapter myQueueListener(MessageListener listener) {
return new MessageListenerAdapter(listener, "onMessage");
}*/
}


Rabbitmq-consumer module:


RobbitMqConfig.java


package com.sachin4java.rabbitmqproducer.config;

import org.springframework.amqp.core.Binding;
import org.springframework.amqp.core.BindingBuilder;
import org.springframework.amqp.core.Queue;
import org.springframework.amqp.core.TopicExchange;
import org.springframework.amqp.rabbit.connection.ConnectionFactory;
import org.springframework.amqp.rabbit.listener.SimpleMessageListenerContainer;
import org.springframework.amqp.rabbit.listener.adapter.MessageListenerAdapter;
import org.springframework.context.annotation.Bean;
import org.springframework.context.annotation.Configuration;


import com.sachin4java.rabbitmqproducer.listener.MessageListener;

@Configuration
public class RobbitMqConfig {
public static final String ROUTING_KEY = "my.queue.key";
@Bean
Queue queue() {
return new Queue(ROUTING_KEY, true);
}


@Bean
TopicExchange exchange() {
return new TopicExchange("my_queue_exchange");
}


@Bean
Binding binding(Queue queue, TopicExchange exchange) {
return BindingBuilder.bind(queue).to(exchange).with(ROUTING_KEY);
}


@Bean
SimpleMessageListenerContainer container(ConnectionFactory connectionFactory,
MessageListenerAdapter listenerAdapter) {
SimpleMessageListenerContainer container = new SimpleMessageListenerContainer();
container.setConnectionFactory(connectionFactory);
container.setQueueNames(ROUTING_KEY);
container.setMessageListener(listenerAdapter);
return container;
}


@Bean
MessageListenerAdapter myQueueListener(MessageListener listener) {
return new MessageListenerAdapter(listener, "onMessage");
}
}


MessageListener.java


package com.sachin4java.rabbitmqproducer.listener;


public interface MessageListener {
public void onMessage(String message);


}


MessageListenerImpl.java


package com.sachin4java.rabbitmqproducer.listener;


import java.util.Date;


import org.springframework.stereotype.Component;


@Component
public class MessageListenerImpl implements MessageListener{


@Override
public void onMessage(String message) {
System.out.println(new Date());
try {
Thread.sleep(5000);
} catch (InterruptedException e) {
// TODO Auto-generated catch block
e.printStackTrace();
}
System.out.println("Message Received:"+message);
System.out.println(new Date());
}

}

GIT Repository


Extract error records while inserting into db table using JDBCIO apache beam in java

 I was inserting data into postgres db using apache beam pipeline. it works perfectly with JdbcIO write of apache beam library. But, now, i ...